
Finding Your Way
Long before I thought of myself as a counselor, pastor, coach, or author, I was a Boy Scout. I started as a Cub Scout, moved through Webelos, and eventually earned my Eagle Scout badge in 1990. I was also involved in the Order of the Arrow and participated in Fancy Feather dancing. Scouting gave me an appreciation for the outdoors and taught me a collection of practical skills that have stayed with me throughout my life.

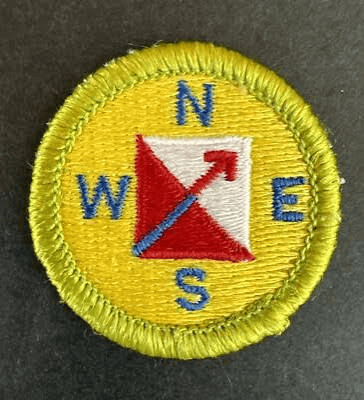
One of my favorites was orienteering.
There was something satisfying about standing in the woods with a map and compass, determining where you were, figuring out where you needed to go, and then finding your way there. Orienteering is more than simply knowing which direction is north. It is the skill of determining your position, establishing a direction of travel, and navigating from one location to another.
Modern technology has made navigation remarkably easy. A GPS device or smartphone can tell us where we are and often give us turn-by-turn directions to wherever we want to go. Even so, I still think there is something valuable about knowing how to find your way with a simple compass.
So let’s go back to the basics.
Understanding Your Compass
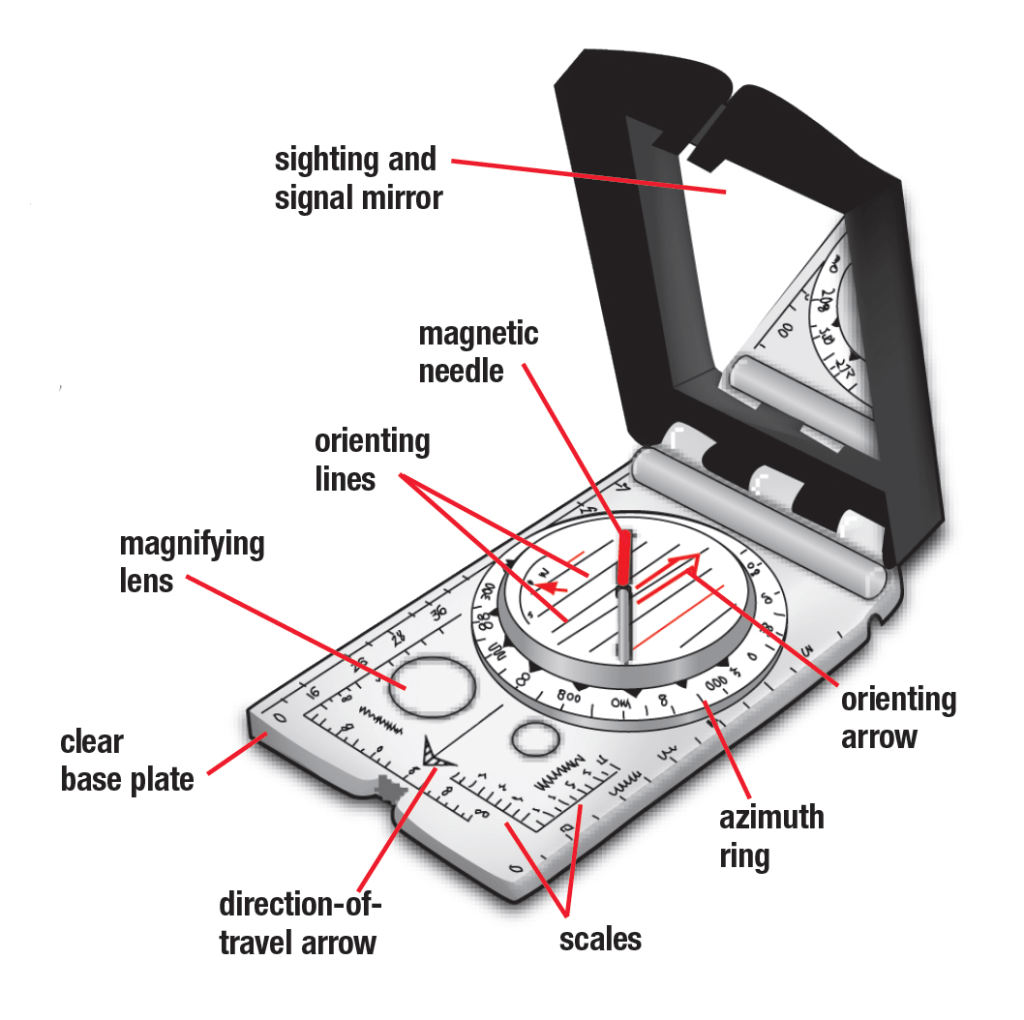
A basic orienteering compass doesn’t have to be complicated, but it helps to understand what the different parts are designed to do.
Magnetic Needle
The magnetic needle is the part that points toward magnetic north. On most compasses, the red end of the needle indicates north.
Baseplate
The baseplate is the clear, flat portion of the compass. Because it is transparent, you can place it over a map while still seeing the terrain and markings underneath.
Direction-of-Travel Arrow
The direction-of-travel arrow shows the direction you intend to travel.
This is one of the first distinctions beginners need to understand. The magnetic needle tells you where magnetic north is; the direction-of-travel arrow tells you where you want to go. They serve two completely different purposes.
Rotating Bezel
The rotating bezel, sometimes called the compass housing, is marked in degrees from 0° through 360°. This allows you to establish a bearing, which gives you a precise direction of travel.
Orienting Arrow
The orienting arrow is located inside the compass housing and is used to align the compass with the magnetic needle.
This is where the familiar Scout phrase comes in:
“Red in the shed.”
The red end of the magnetic needle goes inside the orienting arrow.
Finding Direction
Before you can navigate, you need to know which way you’re facing. Hold the compass reasonably flat and allow the magnetic needle to settle. The red end will point toward magnetic north.
Once you have north, you can identify the other primary directions:
- North = 0° or 360°
- East = 90°
- South = 180°
- West = 270°
The spaces between these primary directions can also be expressed in degrees. For example, 45° is northeast, 135° is southeast, 225° is southwest, and 315° is northwest.
That ability to express direction in degrees is what makes a compass more precise than simply saying, “Go that way.”
What Is a Bearing?
A bearing is simply a direction expressed in degrees. Instead of telling someone to walk northeast, you might tell them to travel on a bearing of 45°. That gives you a specific direction rather than a general one.
Suppose you want to travel on a bearing of 70°. Set the compass so that 70° lines up with the direction-of-travel arrow. Then turn your body until the red end of the magnetic needle lines up with the orienting arrow.
Red in the shed.
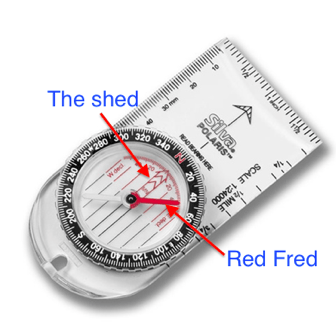
At that point, the direction-of-travel arrow is pointing in the direction you need to travel.
You don’t want to spend the entire journey staring down at your compass, though. Instead, look ahead and choose a recognizable landmark in the direction of travel. Walk toward that landmark, then use the compass again to confirm your direction before selecting another landmark.
This is an important part of practical orienteering. Don’t walk through the woods staring continuously at your compass. The compass establishes your direction, but the terrain around you helps you actually navigate it.
Navigating From a Map
A map and compass become much more useful when you learn to use them together.
If you know your current location and want to travel to another location on the map, place the straight edge of the compass between the two points. When measuring a bearing on a map, ignore the magnetic needle for a moment. Beginners often get tripped up by trying to line up “red in the shed” immediately, but that isn’t what you’re doing at this stage. Your compass is essentially acting as a protractor.
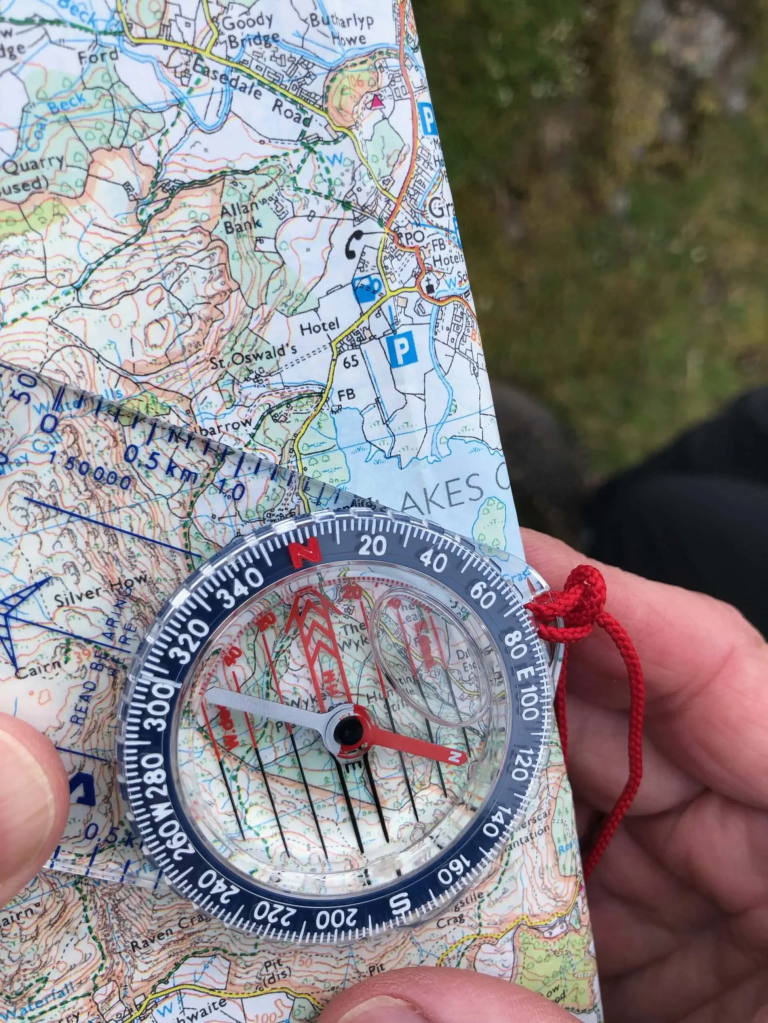
Align the compass baseplate between your starting point and destination, making sure the direction-of-travel arrow points toward the destination. Then rotate the compass housing until its internal orienting lines run parallel with the north-south lines on the map. You can then read your bearing from the index line.
Only after you lift the compass from the map do you turn your body and align the magnetic needle with the orienting arrow. In other words, this is where “red in the shed” becomes part of actually following the bearing.
Depending on the map, compass, and location, you may also need to account for magnetic declination, which is the difference between true north and magnetic north.
Maps are drawn toward geographic True North, meaning the North Pole. Your compass needle, however, points toward Magnetic North, the direction indicated by Earth’s magnetic field. The difference between these two directions is called magnetic declination.
Depending on where you are, you may need to adjust your compass housing a few degrees east or west so that the map and compass are working from the same reference point. That adjustment becomes increasingly important when precision matters, particularly over longer distances.
Taking a Bearing on an Object
Sometimes you are standing in one location and want to determine the direction of something you can see. It might be a tower, distinctive tree, building, hill, or another recognizable landmark.
Point the direction-of-travel arrow toward the object while holding the compass level. Then rotate the compass housing until the orienting arrow lines up with the magnetic needle. The bearing shown on the compass tells you the direction from your position to that object.
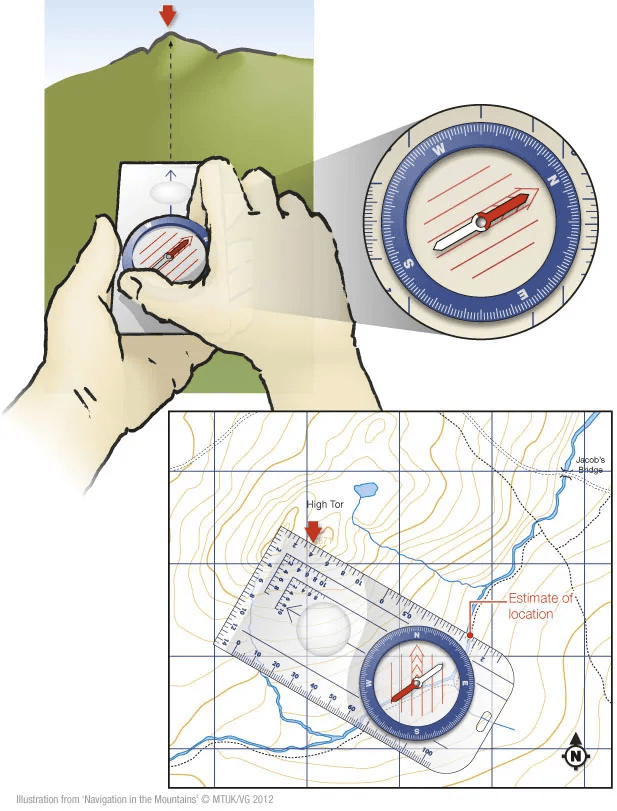
When you combine that information with a map, you can use visible landmarks to help determine where you are and where you need to go.
The Back Bearing
A back bearing is simply the opposite direction from your original bearing. It can be useful when retracing your route or determining the direction from which you came.
The rule is straightforward. If your original bearing is less than 180°, add 180°. If it is greater than 180°, subtract 180°.
For example:
Outbound: 45°
Back bearing: 225°
Or:
Outbound: 225°
Back bearing: 45°
The two bearings are exactly opposite one another.
Knowing how to find a back bearing gives you another way to check your navigation and can be especially helpful when you need to retrace a route.
Navigational Features
A compass gives you direction, but good orienteering involves more than following a number on a dial. One of the real skills of navigation is learning to use the terrain around you.
Handrails
A handrail is a linear feature that you can follow as you travel. A trail, fence, creek, road, or ridgeline can all serve as handrails.
Instead of trying to navigate through completely featureless terrain, you use something obvious to help keep yourself oriented. If you know the creek is supposed to remain on your left as you travel, for example, it becomes a reference point that helps confirm you are still moving in the right direction.
Catching Features
A catching feature is something beyond your destination that tells you when you have gone too far.
Suppose your destination is a small trail crossing. That crossing might be difficult to identify precisely, but a road farther beyond it could serve as your catching feature. If you reach the road, you know you have passed the intended destination and need to correct your course.
The idea is simple: don’t just know where you are going. Know what will tell you that you’ve gone too far.
Attack Points
Sometimes your final destination is difficult to identify from a distance. Rather than trying to navigate directly to a small or indistinct target, it can be easier to navigate first to a larger, easily recognized feature nearby.
That feature becomes your attack point.
Once you reach it, you can make a shorter and more precise approach to your actual destination. Instead of solving the hardest navigational problem all at once, you break it into manageable pieces.
Aiming Off
Aiming off is another useful technique, and it sounds a little strange until you understand why it works.
Suppose you need to reach a stream, but once you reach the stream you need to know whether to turn left or right to reach your destination. If you aim directly at the stream, you may arrive at it without knowing which direction your destination lies.
Instead, intentionally aim slightly to one side.
When you reach the stream, you already know which direction you need to turn. The small intentional error has actually made the next decision easier.
Good navigation isn’t always about traveling in the most direct possible line. Sometimes a deliberate adjustment gives you greater certainty when you reach your next decision point.
The Problem With Walking in a Straight Line
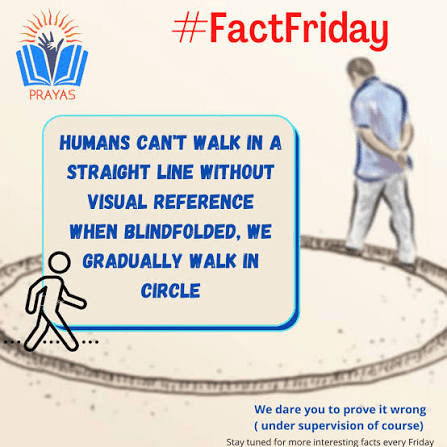
Here’s something that surprised me when I first learned about practical navigation: human beings are not very good at walking perfectly straight for long distances without some kind of reference.
Even small differences in stride can create significant drift. Imagine that your left stride is 30 inches and your right stride is 30.5 inches. That half-inch difference seems insignificant, but if your body consistently moves slightly differently on one side, you can gradually begin to curve rather than travel in a straight line.
A variety of other factors can contribute as well, including unequal leg strength, previous injuries, differences in joint mobility, balance, vision, terrain, and fatigue.
The important lesson is that small directional errors accumulate.
You may barely notice a deviation over ten feet. Over a much longer distance, however, that same error can become substantial. This is one reason people navigating without reliable landmarks can gradually drift off course or even begin walking in circles.
It is also a good reminder that confidence and accuracy are not the same thing. You can feel like you’re walking straight and still be moving farther away from where you intended to go.
Common Beginner Mistakes
When learning compass navigation, a few mistakes show up repeatedly.
Holding the compass tilted. The compass needs to be reasonably level so the needle can move freely.
Confusing the arrows. The magnetic needle points toward magnetic north. The direction-of-travel arrow shows where you want to go.
Forgetting magnetic declination. Depending on the distance and the level of precision required, the difference between true north and magnetic north can matter.
Staring at the compass while walking. Establish your direction, then use landmarks and terrain to navigate. Check the compass again when you need to confirm your course.
Reading the bearing backward. A 180° mistake can send you confidently in exactly the wrong direction.
That last mistake may be the most humbling. It is entirely possible to be very confident, very intentional, and very wrong.
A Simple Practice Exercise

You don’t need a wilderness expedition to begin practicing.
Find an open area where you can safely walk a reasonable distance. Start by determining north, then set your compass to a bearing of 90° and walk approximately 100 yards. Stop, set the compass to the back bearing of 270°, and see if you can return to your starting point.
Once you are comfortable with that, practice with bearings of:
- 45°
- 135°
- 225°
- 315°
As you become more comfortable, move your practice into an area with trees and other terrain features. Instead of simply following a bearing across an open space, begin using landmarks as part of your navigation. Choose a tree or another recognizable feature, travel to it, confirm your direction, and then select your next landmark.
You’re practicing more than the mechanics of using a compass. You’re learning how to maintain orientation while moving through an environment that can make staying on course surprisingly difficult.
The Three-Leg Triangle Challenge
Want a fun, hands-on test of your accuracy? Try the classic geometric triangle exercise in your backyard or an open park.
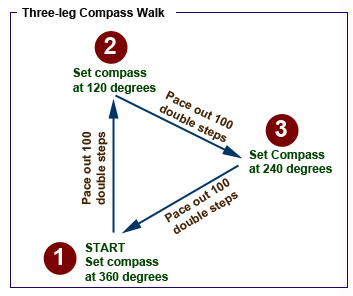
Start by placing a small marker, such as a coin, hat, or stick, on the ground at your feet. This is your starting point.
Set your compass to 0° (North) and walk 50 paces, counting every time your left foot hits the ground. Stop there.
Next, add 120° to your bearing. Set the compass to 120° (Southeast) and walk another 50 paces.
Finally, add another 120°. Set the compass to 240° (Southwest) and walk your final 50 paces.
If your bearings were precise and your pace remained consistent, you should end up standing very close to your original marker.
This exercise is a great illustration of how small errors accumulate. A slight error on the first leg becomes part of the starting point for the second leg, and another small error gets carried into the third. By the time you complete the triangle, you can see just how much precision matters.
It also makes a simple point that is easy to understand once you’ve experienced it: knowing where you intended to go doesn’t guarantee that you actually got there.
Why I Still Like Orienteering
I learned compass navigation as a Boy Scout more than three decades ago, but I still appreciate the skill. Maybe part of that is simply nostalgia. I still enjoy being outdoors, and there is something satisfying about using a simple tool to solve a practical problem.
But I think there is something deeper about knowing how to find your way.
A compass doesn’t eliminate obstacles. It doesn’t tell you whether the trail ahead will be easy, and it doesn’t remove the need to pay attention. What it does is give you a reliable reference point.
Sometimes that’s exactly what we need.
The woods can teach us a lot about finding our way.
Interested in the life lesson behind compass navigation? Read the companion article, “The Compass Check: Staying on Course When Small Deviations Add Up.”

