Ahhhh summer is almost upon us and that means, busting out the grills. I love cooking outdoors. I have a gas grill that I enjoy using, but nothing compares to that smoky flavor that comes from using a pit or charcoal grill. I stumbled upon a good deal and I purchased a new pit. Well after some assembly required my pit was ready to cure/season.

This is an important step that some overlook. First off it helps prolong the life of your grill. More importantly it helps the flavor of your food. Nothing is worst than being excited to get your first offerings off of a new grill and have it taste like paint.
See grills and pits are a lot like cast iron cook ware in this regards, it needs to be seasoned first and the more you use it, the better it gets. This is due to the nature of how a grill and pit works, they smoke the juices from what you are cooking and they get vaporized into the grill. This is what provides the unique grill flavor to the food cooked in one and why the more it is used the better it gets.
 I started by putting vegetable oil on a cotton rag and rubbing the entire inside of the pit. After this was done it was time to light a fire. I built the fire in the fire box and let it go. I let the temperature stay around 250 ( most air vent s were closed) and let it go that way for an hour or more. I then opened all the vents and let the temperature rise. My intent was just to get to 45oand let it stay there for a bit before raising the temp. Well it is a new pit and some trial and error ensued with the temp quickly climbing to 500. This is perfectly okay. Some tutorials actually say just set it above 400 and let it go for 30-45 minutes. I am a firm believer in low temp and longer cooking times and well some of that idea flows over into the way I season my pits. It didn’t take much closing to get the temp back down.

I had purchased some hog jowl and placed that straight on the fire and allowed the flavor of that to permeate through the pit and just let it keep burning for several hours. Some people also add spices to the fire and other ideas to add flavor. This is where individual chef personalities take over. I was not worried about that because I was eager to baptize this baby with meat.
 I want to point out, depending on how the paint quality , the heat will cause some flaking on the outside of the grill, especially on the fire box if it has an off set firebox. This is okay. If it bugs you, you can always purchase high temperature grill paint and touch it up. It should go with out needing to be said, but obviously wait for it to completely cool before attempting to repaint. Also wait for it to dry before grilling again.
 Time to cook some meat.I fired up the main area with charcoal and waited for the coals to completely ignite and become ready. I then started off the initial cooking with grilling one of my favorite burger recipes (recipe below).
After the burgers were ready I added two types of seasoned pork chops along with some chicken legs. I had prepped some herb and garlic potatoes and had them in foil ready to go on the grill as well. When all of that had finished, there was still plenty of great cooking coals. I hate to let good coals go to waste so I prepped some fish with garlic, curry, and some other spices, wrapped in foil and through it on the grill. Between the visiting with friends, kids, and wanting to get my grub on, I forgot to take finished meat pictures. However it  was a successful maiden trip with the new pit. All the food possessed excellent flavors. The friends and family all enjoyed themselves, so mission accomplished and I am confident that this pit’s future is indeed very bright as age will only improve the seasoning.
Burger Recipe
3 lbs ground beef (chuck or sirloin is fine, I actually do not mind the fattier meat for burgers)
1lb of ground pork
1lb ground breakfast sausage
1 package Bratwurst
1 lb bacon
2 tsp water
1 tsp paprika
1tsp salt
1tsp black pepper
1 tsp garlic powder
I first chopped and fried the bacon, then added it along with the rest of the ingredients in a large bowl. Mix the ingredients together well and form into patties. I personally like to make mine about an inch thick. I was able to get 24 patties. Slap on the grill and cook. I like my steaks medium rare, but prefer my ground meat to be fully cooked, but not burnt offerings.
However you do it, just get outside and enjoy family, and friends. Happy grilling!
A few extras:
https://www.youtube.com/watch?v=W0jVkPYQjEo
https://www.youtube.com/watch?v=P844OuDbRcU

 Fire, arguably man’s most useful primitive skill, is still one of the most important bush craft or outdoorsman skills. From starting grills, warming up a house with a fireplace, burning off trash and garbage, the productive uses of fire are numerous. In a survival situation, the presence of a fire is a game changer. With benefits that include its’ ability to help regulate core body temperature, water purification, cooking, and the sheer psychological boost that just having a fire brings, fire craft is a skill ev
 ery individual needs.
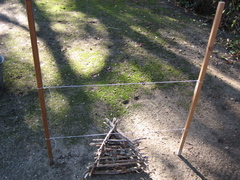 Back in Boy Scouts, we would have one-match competitions as p
 ou should never be caught with just one match. Heck you should never be caught out with just one way to start a fire. A common motto in the survival and bush craft world states :”two is one, one is none.”


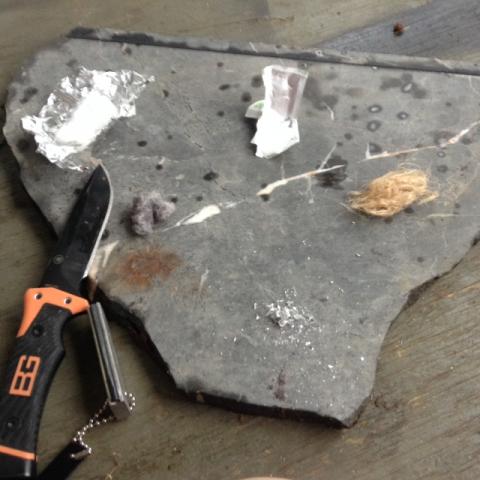 h natural and man-made. Natural tinder would include dry grass or leaves, wood shavings, feather sticks, Cattail fluff, lighter wood,etc.
 ves useful especially when everything is damp. Wet tinder will not light.
 This is what keeps the fire burning nice and hot and for as long as you keep giving it fuel. This does not have to be giant logs, think about the size of your forearm or wrist. Remember, the larger the log, the longer it will take to start burning. When building a fire you are always going from smaller pieces to larger.
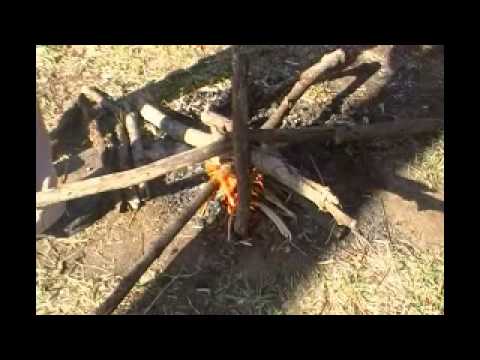


 Depending on the type of source and tinder, you may need to gently blow on your ember as you add the kindling to this in order to coax the flame. As the flame grows, slowly add more kindling and ultimately fuel wood creating a larger and larger fire until you reached the desired size based on your needs. It is important to not go too fast when adding wood. Let the the kindling have time to ignite and have create a good base with a decent amount of kindling burning before moving up to the fuel wood. The fuel wood will take longer to ignite and therefore the kindling must keep the flame going during this time.


 There are many types of cordage from both natural and man made materials.

 braided sheath. All this and it is still a very small size. The beauty of it is due to it’s construction. You can take a piece apart and have 7 x the length of the cut portion in a smaller diameter cordage than can now be used for sewing repairs, or a number of projects well as the sheath it rests inside. This greatly increases the usability of the paracord. A good rule of thumb regarding items to carry with you out into the woods is for it to have multiple purposes. Since the paracord itself offers more than on size of cordage, it is an excellent item to carry. I like to replace my shoe laces with paracord so that I always have some on me. If I need to use the cordage, I can take it apart and still have the sheath to lace up my shoes. If I can only have one type of cord, more often than not I choose paracord.
 You can get 1,000 ft for around $15.00. This line is smaller than paracord, so you can carry more of it. However it does not break down into multiple sizes. It also has a lower weight capacity usually being 150 to 350 lbs depending on the brand and size of bank line.